Guides
Auto clicking on a Mac, from setup to stop
A Mac can auto click, and the quickest way there is free: InputConfig, on the Mac App Store, has a built-in Auto Clicker preset that starts clicking from fn F6, a controller's right trigger, or a mouse's side button. This guide takes you from nothing to an auto clicker tuned to your job, with a speed you chose, a limit, and a way to stop it that always works. Allow about fifteen minutes, most of it spent trying speeds rather than reading.
It is for anyone who needs the same click over and over: an idle game, a long run of identical dialogs, a test of your own app, or hands that should not be doing that work. I made InputConfig, so I will also say where it stops being the right tool.
 InputConfig is free on the Mac App Store. macOS 14 or later, no account, no tracking, open source.
On this page: 15 sections
- Steps
- How to read this guide
- Pick the smallest tool that does the job
- Step by step: clicking in five minutes
- Step by step: tune it to the job
- Know how fast it really clicks
- Get single clicks, or a real double click
- Run it only while one app is in front
- How to go back
- If it does not click
- What it cannot do
- Find the page for one job
- Where it stands
- Download
- Questions
Steps
- Install InputConfig from the Mac App Store and switch it on in System Settings, Privacy & Security, Accessibility when it asks.
- In the sidebar, open Desktop & Productivity, click Auto Clicker, and press Activate.
- Point at something harmless, press fn F6 or pull a controller's right trigger to start clicking, and press it again to stop.
- Press Edit, open a row's Options, and change Every to the gap you want in milliseconds.
- Add Vary by up to for uneven timing, and Stop after so a run ends by itself.
- For one spot, choose At a fixed point: use the pointer's position now in the row's click menu, then move the pointer there within three seconds.
- Start runs from a control that does nothing else, such as a mouse side button with Block the button's own action ticked.
- Learn the emergency stop, Control Option Command period, before the first long run.
How to read this guide
Start where you are:
- Clicking in the next two minutes? Go straight to Step 1 and stop after Step 3. The preset needs no settings.
- Already clicking, but too fast or too regular? Read Step 5 onward, then how fast it really clicks.
- Not sure you need an app at all? Start with the smallest tool that does the job.
- A run that will not stop? Jump to how to go back.
Whatever you skip, keep one line: the emergency stop is Control Option Command period, from any app. Learn the way out first, and every other setting is safe to try.
Pick the smallest tool that does the job
This part covers what to reach for before you build anything. Climb this ladder, smallest step first, and stop at the first rung that does the job:
- Dwell, built into macOS. It clicks when the pointer rests on a spot and a short countdown ends: one action per rest, for clicking without pressing. It does not click over and over on a timer. Apple keeps it with the Accessibility Keyboard, in System Settings, Accessibility, Keyboard (Apple's Dwell guide).
- The built-in Auto Clicker preset. Nothing to build: activate it and press fn F6, or pull a controller's right trigger. It covers on and off, held bursts, a fixed count, and a human pace.
- One row of your own. Any row with a Mouse Button output can auto click, from any control you choose, at any gap from 5 ms to a minute.
- A fixed point and a count. The same row, set to click one spot on screen and stop after a set number of clicks.
Automator's Watch Me Do, with a Loop after it, still ships with macOS 27 and can replay recorded clicks. I have not tested it for this job, so it gets a fair word on how to auto click on a Mac, including the built-in options rather than steps here. Most people never need to go past the second rung.
Step by step: clicking in five minutes
These four steps get you from an empty Mac to a working auto clicker and a speed you chose. Each one says what to check before you move on.
Step 1: Install it and allow Accessibility
- You: Install InputConfig from the Mac App Store and open it. When it asks, switch InputConfig on in System Settings, Privacy & Security, Accessibility.
- macOS: Lets InputConfig send clicks. Every auto clicker on a Mac needs this same permission, because macOS only delivers clicks made by an app that has it.
- Check: In InputConfig, Settings, General, Accessibility permission shows that it is on. Later, if the menu bar icon turns orange while a preset runs, the permission is missing.
The permission is about sending. InputConfig has no network access and no account, and its source is public under the MIT license, so what the Accessibility permission allows can be checked line by line.
Step 2: Activate the Auto Clicker preset
- You: In the sidebar, open the Desktop & Productivity folder, click Auto Clicker, and press Activate.
- InputConfig: Starts the preset. Nothing clicks yet, because every row waits for its control.
- Check: The button now reads Deactivate, and the preset's page lists every row and what it does.
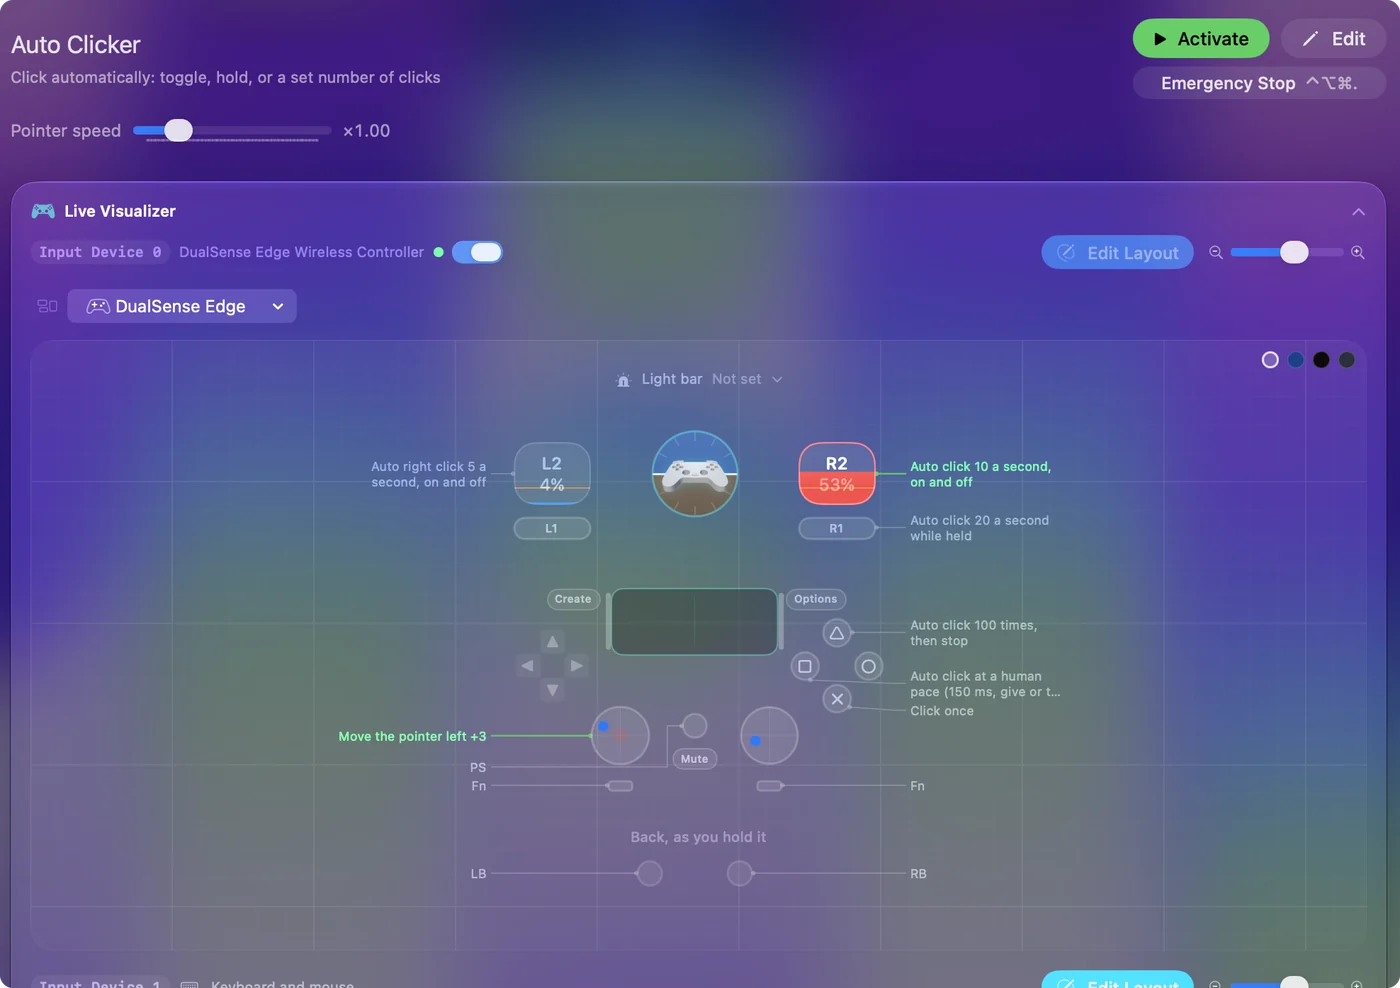
Step 3: Start it, then stop it
- You: Point at something harmless, such as an empty TextEdit window, and press fn F6 once. With a controller, pull the right trigger once instead.
- InputConfig: Clicks the left button 10 times a second where the pointer is, until you press the same control again. On a controller that vibrates, the start gives a light buzz, so you feel the run begin.
- Check: Press fn F6, or the right trigger, a second time. The clicking stops.
On a MacBook, hold fn. On its own, the F6 key is a system key (Do Not Disturb on recent models) that macOS keeps for itself, so no app ever sees it, and F7 on its own is a media key. With fn held, both reach InputConfig as plain F6 and F7. If you have switched on Use F1, F2, etc. keys as standard function keys in System Settings, Keyboard, Keyboard Shortcuts, Function Keys, they work without fn. Every row in the preset, by control:
| Control | What it does |
|---|---|
| Right trigger (RT / R2) | Left click 10 a second. One pull starts, the next stops. |
| Left trigger (LT / L2) | Right click 5 a second, on and off. |
| Right bumper (RB / R1) | Left click 20 a second, only while held. |
| Y / Triangle | 100 left clicks, then it stops by itself. |
| X / Square | Left click at a human pace, 150 ms give or take 40, on and off. |
| Left stick | Moves the pointer, so you can aim without a mouse. |
| A / Cross | One click. |
| fn F6 | Left click 10 a second, on and off. |
| fn F7 | Right click 5 a second, on and off. |
| Mouse button 4 | Left click 15 a second while held. While the preset runs, that button no longer goes Back in a browser. |
Every controller and trigger choice is covered on auto clicking with a controller and auto clicker hotkeys on a Mac. Press once to start, and press the same control again to stop.
Step 4: Change the speed
- You: Press Edit on the preset, find the row you use (the right trigger, or fn F6), and open its Options. In the How it fires box, type a new number into Every.
- InputConfig: Shows the rate beside the field, such as (10.0 per second) for 100 ms. Every accepts 5 ms up to 60,000 ms, a full minute.
- Check: Save, close the editor, start a run, and listen. 50 ms is 20 a second, 200 ms is 5, and 1000 ms is one.
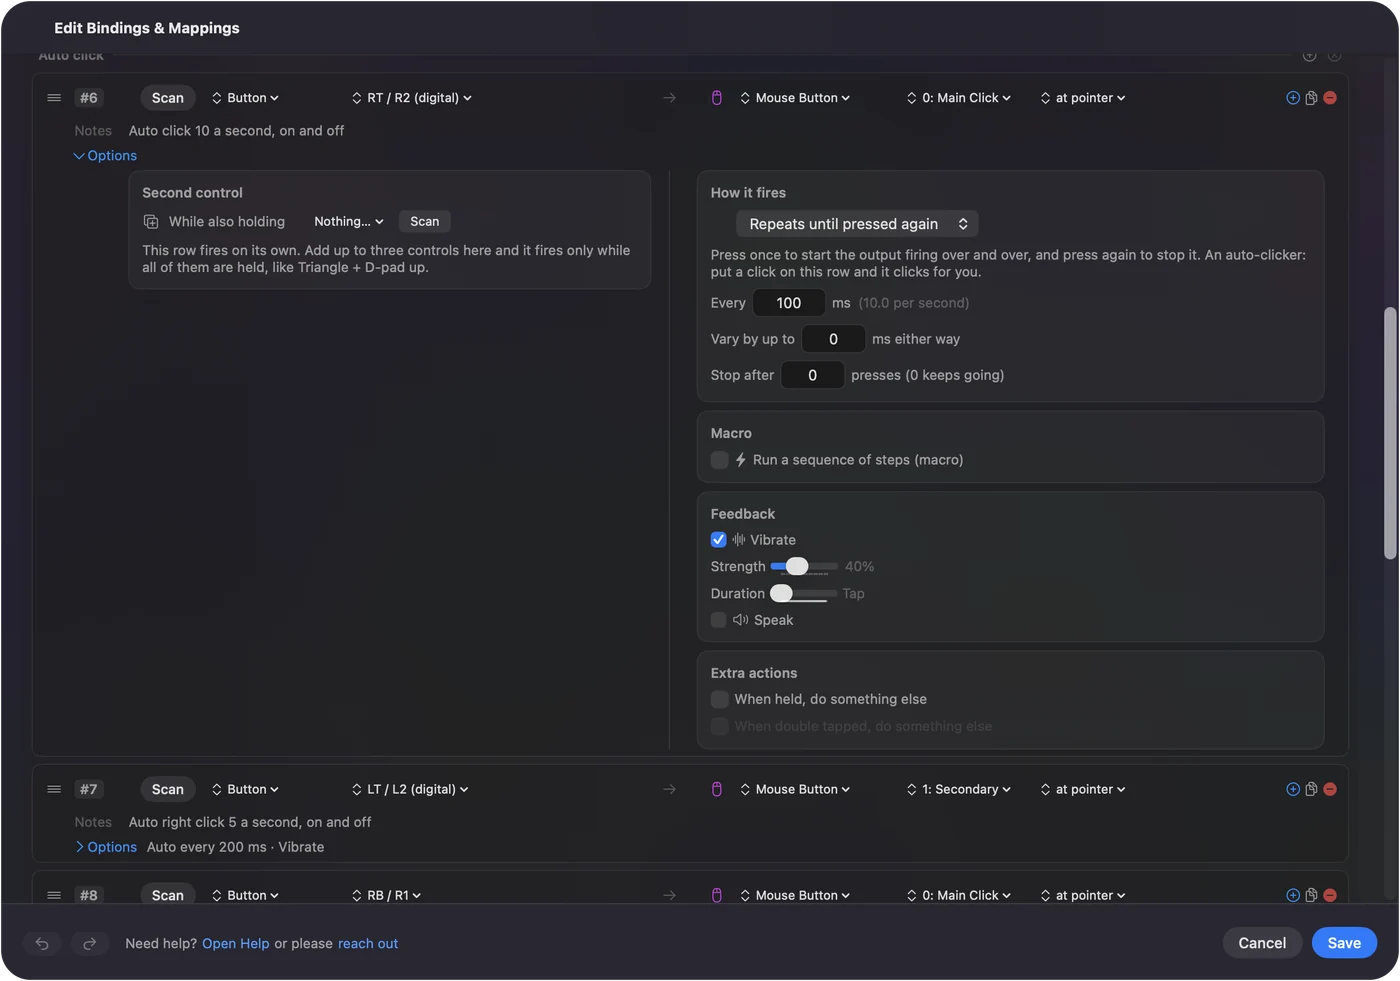
Opening the editor stops any run and holds keys back until you close it, so always test with the editor closed. Editing a built-in preset changes your copy of it; to keep the original as it shipped, right-click it in the sidebar and choose Duplicate first, then edit the duplicate. To turn a rate into milliseconds or back, the CPS to ms calculator does the arithmetic, and auto clicker CPS on a Mac explains the numbers.
Step by step: tune it to the job
These four steps shape the clicking to a real task: uneven timing, a limit, one spot on screen, and a control you never press by accident. If you skipped ahead, every setting below lives in a row's Options, in the How it fires box.
Step 5: Make the timing uneven
- You: Set Vary by up to, for example 40 ms. It accepts up to 10,000 ms.
- InputConfig: Draws a new random gap after every click, anywhere from Every minus that amount to Every plus it, so the average stays at Every. The preset's X / Square row works this way: 150 ms give or take 40, so every gap lands between 110 and 190 ms.
- Check: The clicks sound irregular, and the count over a minute is still close to what Every says.
Variation is about feel, for a job where a perfectly regular beat looks or works wrong. It is not a way to hide anything, and I will not promise it makes clicking pass any game's checks. More worked numbers are on random interval auto clicking.
Step 6: Set a limit
- You: Set Stop after to a number, for example 100. It accepts up to 100,000, and 0 keeps going until you stop it.
- InputConfig: Ends the run by itself after that many clicks. The preset's Y / Triangle row clicks 100 times at 100 ms, so its run lasts ten seconds.
- Check: Start a run, take your hands away, and watch it stop on its own.
A run lasts the number of clicks times the gap: 500 clicks at 200 ms is 100 seconds. Clicking a set number of times also covers Repeat, for two or three clicks per press. Stop after is the habit that keeps a forgotten run from clicking all afternoon.
Step 7: Click one fixed spot
- You: On the row, open the click menu beside the Mouse Button output (it reads at pointer), choose At a fixed point: use the pointer's position now, then move the pointer to the spot.
- InputConfig: Takes the position three seconds later, so you have time to get there, and shows it on the row as at x, y, with X and Y fields beside it for typing exact numbers. From then on the pointer jumps to that spot before every click.
- Check: Start a run and watch the pointer land on the spot before each click. To go back, choose Where the pointer is in the same menu.

Leave the mouse alone during a fixed-point run, because the pointer is moved for every click. If the spot was on a display that is no longer connected, InputConfig skips the click rather than clicking somewhere else, and the activity log says so. For two spots, use two rows, each with its own control. The details are on auto clicking the same spot.
Step 8: Choose a control you never press by accident
- You: On the row, press Scan and press the control that should start it: a mouse side button, a key nothing uses such as F13, a controller button, or a MIDI pad.
- InputConfig: Listens to the keyboard alongside macOS and cannot take a key away, so a bound key still does its normal job. A mouse's middle or side button can be held back: tick Block the button's own action on its row, and while the preset runs, apps stop seeing that button.
- Check: Press the control with another app in front. Clicking starts, and nothing else happens.
The preset already does this for mouse button 4. For a keyboard, F13 to F19 type nothing anywhere (see F13 to F19 on a Mac), and mouse side buttons on a Mac covers the rest. The best start key is one that does nothing else.
Build the same thing from an empty preset
- Make a new preset and click Add a new bind.
- Press Scan, then press the control that will start and stop the clicking.
- Set the output to Mouse Button and pick 0: Main Click for the left button, 1: Secondary for the right, or 2: Middle.
- Open the row's Options and set How it fires to Repeats until pressed again, or Repeats while held for clicking only while you hold the control.
- Set Every, and if you like, Vary by up to and Stop after. Save, close the editor and press Activate.
Know how fast it really clicks
This part covers the real speed limit, which is not the number in Every. InputConfig checks its controls a set number of times a second and sends at most one auto click per check, so that rate is the ceiling. It is in Settings, Advanced, Polling rate: with Auto-switch on power source on, as it is out of the box, it runs at 120 Hz on a power adapter and 60 Hz on battery, and either can be set to 60, 120, 180 or 240 Hz.
| Every | The row shows | On battery, 60 Hz | On power, 120 Hz |
|---|---|---|---|
| 1000 ms | 1.0 per second | 1 a second | 1 a second |
| 200 ms | 5.0 per second | 5 | 5 |
| 100 ms | 10.0 per second | 10 | 10 |
| 50 ms | 20.0 per second | 20 | 20 |
| 20 ms | 50.0 per second | 50 | 50 |
| 10 ms | 100.0 per second | about 60 | 100 |
| 5 ms | 200.0 per second | about 60 | about 120 |
That table is the arithmetic of how InputConfig times clicks, not a measurement of what any app receives. Each click is held down for 40 percent of the gap, at most 80 ms, then let go, so slow clicks still feel like clicks.
- Start at 10 a second. It is plenty for most jobs, and many apps and games do not count clicks that arrive much faster. That is caution, not something I measured in any one app.
- Raise the polling rate only for a reason. 180 and 240 Hz cost a little more power and only matter for gaps under about 8 ms.
- Expect half speed on battery. A 10 ms row on battery runs at about 60 a second, not 100, unless you raise the battery rate.
Every setting in InputConfig is described on the settings page. The polling rate, not the Every field, is the real speed limit.
Get single clicks, or a real double click
This part covers a confusion no auto clicker page seems to explain: two clicks close together can count as a double click, which opens files and selects words.
- An auto click run. Every click goes out as its own single click, however fast the run, so a run never opens a file by accident.
- A real double click from one press. Leave the row on Fires while held and set Repeat to 2 times per press, with a short Wait between them. A Repeat of 2 or 3 on a click goes out as a real double or triple click.
- A Repeat of 4 or more. A string of single clicks, sent the way an auto click run sends them.
Repeat goes up to 100 per press, with a Wait from 10 to 5,000 ms. Double clicking from one press goes through it step by step.
Run it only while one app is in front
An auto clicker that only exists while its app is in front cannot click into the wrong window. InputConfig can switch a preset on and off with the front app.
- You: Press Edit on the Auto Clicker preset, open Automation & Gaming Utilities, and add the app under Activate when these apps are in front. Then turn on Switch presets when the front app changes in Settings, Advanced.
- InputConfig: Activates the preset when that app comes to the front and steps aside when you leave it, which also ends any run.
- Check: Start a run, then switch to another app. The clicking stops.
The full feature is on switching presets by app. Tie the preset to one app, and a run ends the moment you leave it.
How to go back
This part covers every way out, from a single press to deleting the preset. If you skipped ahead: the emergency stop is Control Option Command period. Climb this ladder, smallest step first:
- Press the same control again. A Repeats until pressed again row stops on the next press.
- Let go. A Repeats while held row, such as the right bumper or mouse button 4, stops when you release it.
- Let Stop after finish. A row with a limit ends by itself.
- Use the emergency stop. Press Control Option Command period from any app, hold Back and Start together on the controller for three seconds (View and Menu on an Xbox pad, Create and Options on a DualSense), or click Emergency Stop in the menu bar. It turns the active preset off and lets go of every key and mouse button it was holding.
- Lock the Mac. Locking stops every run, and nothing starts again by itself after you unlock.
- Deactivate the preset. Press Stop in the menu bar, or Deactivate on the preset's page.
- Delete the row or the preset. Nothing else on the Mac changes, and the built-in preset can be downloaded again from this page.
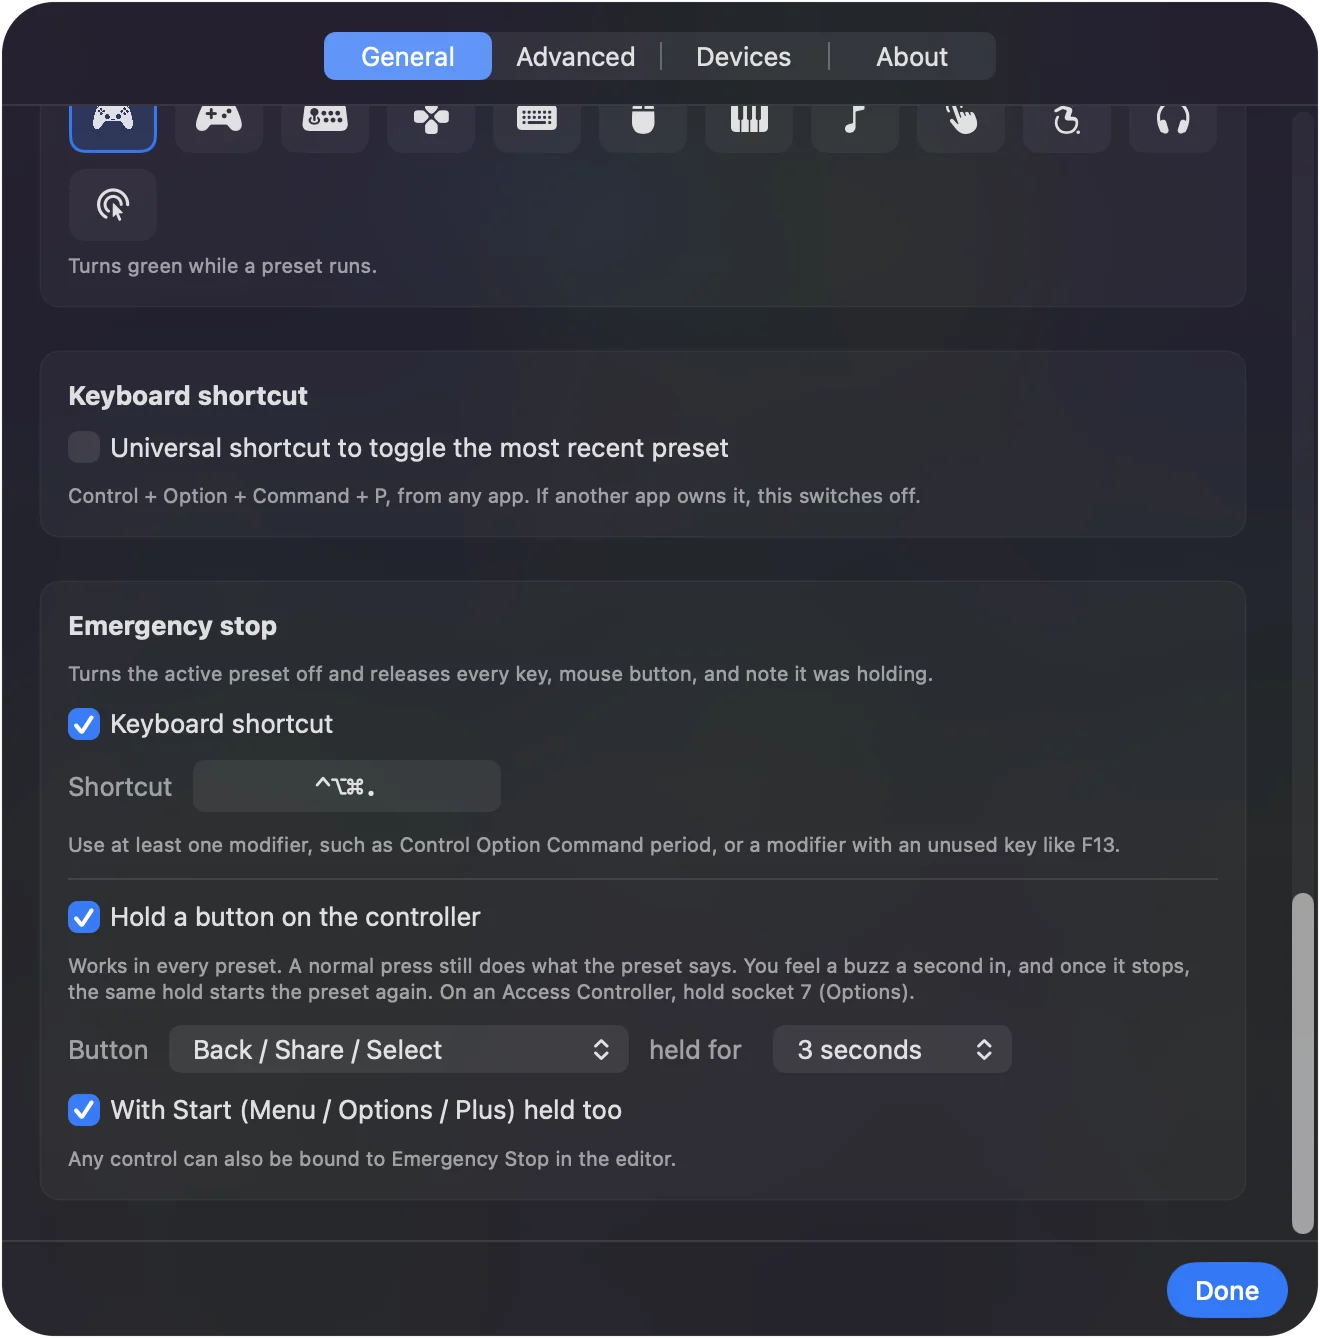
The emergency stop page covers changing the shortcut, the button and the hold, and how to stop an auto clicker covers other apps too. The emergency stop only ever stops, so it is always safe to press.
If it does not click
Most of the time the cause is one of a few small things. Climb this ladder, smallest step first:
- Close the editor. While the preset editor is open, InputConfig stops runs and holds keys back.
- Check the preset is active. Its button reads Deactivate when it is running.
- Hold fn. On a MacBook, F6 and F7 only reach InputConfig with fn held.
- Check Accessibility. An orange menu bar icon means a running preset needs it. If InputConfig is switched on in System Settings and still cannot click, usually after an update, remove it from the list with the minus button, add it back, and relaunch InputConfig.
- Check the fixed point. If the spot was on a display that is gone, every click is skipped. The activity log (Settings, Advanced, Show the activity log) names the point.
- Slow it down. If an app counts fewer clicks than you send, raise Every. Some apps only register clicks at a pace they allow.
When an auto clicker is not working on a Mac goes through each rung with what to look for.
What it cannot do
- A recorded tour of several spots. Each row clicks one place, the pointer or one fixed point. A macro can chain keys and clicks with waits, but its steps have no screen position, and a macro row only fires while held or toggles; it cannot use the two Repeats choices. For a recorded multi-step click sequence, another app fits better.
- Faster than the polling rate. At most one auto click per check, and Every stops at 5 ms, so 200 a second is the ceiling, reached only with the polling rate at 240 Hz.
- A promise about rules. Clicks are sent the same way any Mac app sends them. Many online games forbid auto clickers in their rules and some detect them. I have not tested InputConfig against any game's anti-cheat, and I will not promise that any speed or variation is allowed or undetectable.
- Clicking without the permission. It needs Accessibility, like every app that clicks for you, and macOS 14 or later, on Apple silicon or Intel.
Whether an auto clicker is safe on a Mac takes the rules question further.
Find the page for one job
This part is a map of every auto clicker page on this site, grouped by the job in front of you. Each one goes deeper than a step here can.
- The basics. A free auto clicker for Mac is the one-page summary, how to auto click on a Mac compares the built-in options, and the Auto Clicker preset page lists every row.
- The trigger. Hotkeys, and why F6 needs fn, and a PS5, Xbox or Switch controller as the trigger.
- The speed. CPS and milliseconds, the CPS to ms calculator and click test, and random intervals.
- The click. One fixed spot, a set number of clicks, right and middle clicks, and real double clicks.
- The trouble. Stopping a runaway clicker, fixing one that does nothing, and whether it is safe and allowed.
- A specific job. Fewer presses for hands that tire, Roblox, Minecraft, and Cookie Clicker and other idle games. The game pages start with the rules.
- Other apps. Mac auto clickers compared, and OP Auto Clicker on a Mac for anyone coming from Windows.
Where it stands
An auto clicker on a Mac is three decisions: how fast, how it ends, and what starts it. The preset makes all three for you on day one, and every one of them is a field you can change later.
- The fastest start. Activate Auto Clicker and press fn F6, or pull the right trigger.
- The tuned version. Every for the pace, Vary by up to for feel, Stop after for the end.
- The safe habit. A start key that does nothing else, and the emergency stop learned before the first long run.
Next, the Auto Clicker preset page lists every row with its exact settings, and the free auto clicker for Mac page is the one-page summary. Set a limit, pick a key that does nothing else, and auto clicking stays a tool you control.
Download
- Auto Clicker presetThe same preset that is built into InputConfig 1.6, for another Mac or one where it was deleted. 9 KB
To add a downloaded preset: drop the file on InputConfig's Dock icon, or click the … button next to any preset in the sidebar, choose Import Preset File, and pick the file. It lands in the sidebar, ready to activate or edit. Any launch target inside a preset file is cleared on import; add one yourself in the editor if you want it.
Questions
How do I use an auto clicker on a Mac?
Install InputConfig from the Mac App Store, allow Accessibility, then activate the built-in Auto Clicker preset in the Desktop & Productivity folder. Press fn F6 to start clicking 10 times a second and press it again to stop.
Why does F6 not start my auto clicker on a MacBook?
On recent MacBooks the F6 key on its own is a system key that macOS keeps for itself, so no app sees it. Hold fn and press F6, or switch on Use F1, F2, etc. keys as standard function keys in System Settings, Keyboard.
How fast can an auto clicker click on a Mac?
InputConfig accepts a gap as short as 5 ms, but it sends at most one click per poll, so the polling rate is the ceiling: 120 a second on a power adapter and 60 on battery by default, and 200 a second at most, with the polling rate at 240 Hz.
Can I start an auto clicker with a PS5 or Xbox controller?
In the Auto Clicker preset, the right trigger starts and stops left clicks, the left trigger right clicks, and the right bumper clicks while held. Any button on a supported controller can be the trigger of your own row.
How do I stop an auto clicker on a Mac?
Press the same control again, or use the emergency stop: Control Option Command period from any app, a three-second hold of Back and Start on the controller, or Emergency Stop in the menu bar.
Can an auto clicker get me banned?
It can. Many online games forbid auto clickers and some detect them, so check the rules of whatever you use it in. I will not promise that any speed or variation is allowed or undetectable.
Related
Free. macOS 14 or later. No account, nothing leaves your Mac. Open source on GitHub.