Ableton Live from a game controller
 The Ableton Live layout is built into InputConfig, free on the Mac App Store. You don't have to make an account, there are no subscriptions, and nothing is locked. Optimized for Apple silicon.
On a Mac: Live reads its default keys from this layout. For notes and CC, switch on the InputConfig MIDI input in Live's Link, Tempo and MIDI settings.
Yes, a game controller runs Ableton Live's transport on a Mac, and in Session view the D-pad walks the clip grid: select a clip, launch the scene, record. The same pad can also be a MIDI instrument in Live, through InputConfig's virtual port, with buttons as notes and the sticks as control change.
On this page: 7 sections
The layout, control by control
How the layout thinks
- Transport. Play and stop (Space) on the bottom face button, record (F9) on the right.
- Views and launch. Tab swaps Session and Arrangement on the left, and Return on the top launches the selection.
- Walk the grid. The D-pad moves the selection around Session view.
- Undo, save, scroll. Undo and Save on the bumpers, and the right stick scrolls.
Live reads its default keys from this layout. In Session view, the D-pad is the clip grid.
Give a key to what Live leaves empty
Live gives the metronome and Stop All Clips no default key, so assign one with Key Map Mode.
- You: Press Command K for Key Map Mode, click the control, press a spare key such as F13, and press Command K again. Then give the touchpad press an F13 row in InputConfig.
- InputConfig: Sends F13 when you press the touchpad.
- Check: Press the touchpad and the control you mapped toggles.
- Loop. Command L (Loop Selection) on a stick click.
- Both in one preset. Transport rows and MIDI rows can share a preset. A face button can be a note while a bumper stays undo.
- Transport from a drum machine. InputConfig can also take MIDI Start, Continue and Stop as inputs, so a hardware sequencer's play button can fire any shortcut.
F13 to F19 are good choices because nothing else uses them. Key Map Mode plus an F13 row gives any control in Live a button.
Map a stick to any control in Live
In Settings (Preferences in older versions), Link, Tempo and MIDI, switch on Track and Remote for the InputConfig input. The built-in MIDI: CC Dials preset already puts CC on both sticks and both triggers, and a stick reaches the full 0 to 127 range past its deadzone.
- You: Press Command M for MIDI Map Mode, click a device knob, a send or a crossfader, and move the stick.
- InputConfig: Sends the stick's CC on the InputConfig port.
- Check: Press Command M again and move the stick. The control follows it, and records into automation like a hardware knob.
Live sees a MIDI input named InputConfig, not a control surface script. Map controls with MIDI Map Mode, and a stick becomes a knob.
Get it in two clicks
- Get InputConfig free on the Mac App Store, open it, and click Smart Preset Maker on the welcome screen.
- Search for Ableton Live and pick it. The layout is created as a preset in your sidebar, named and ready.
- Press Activate. Every row can be changed afterwards: the editor's Scan button rebinds any control the moment you touch it.
Every binding, as a table
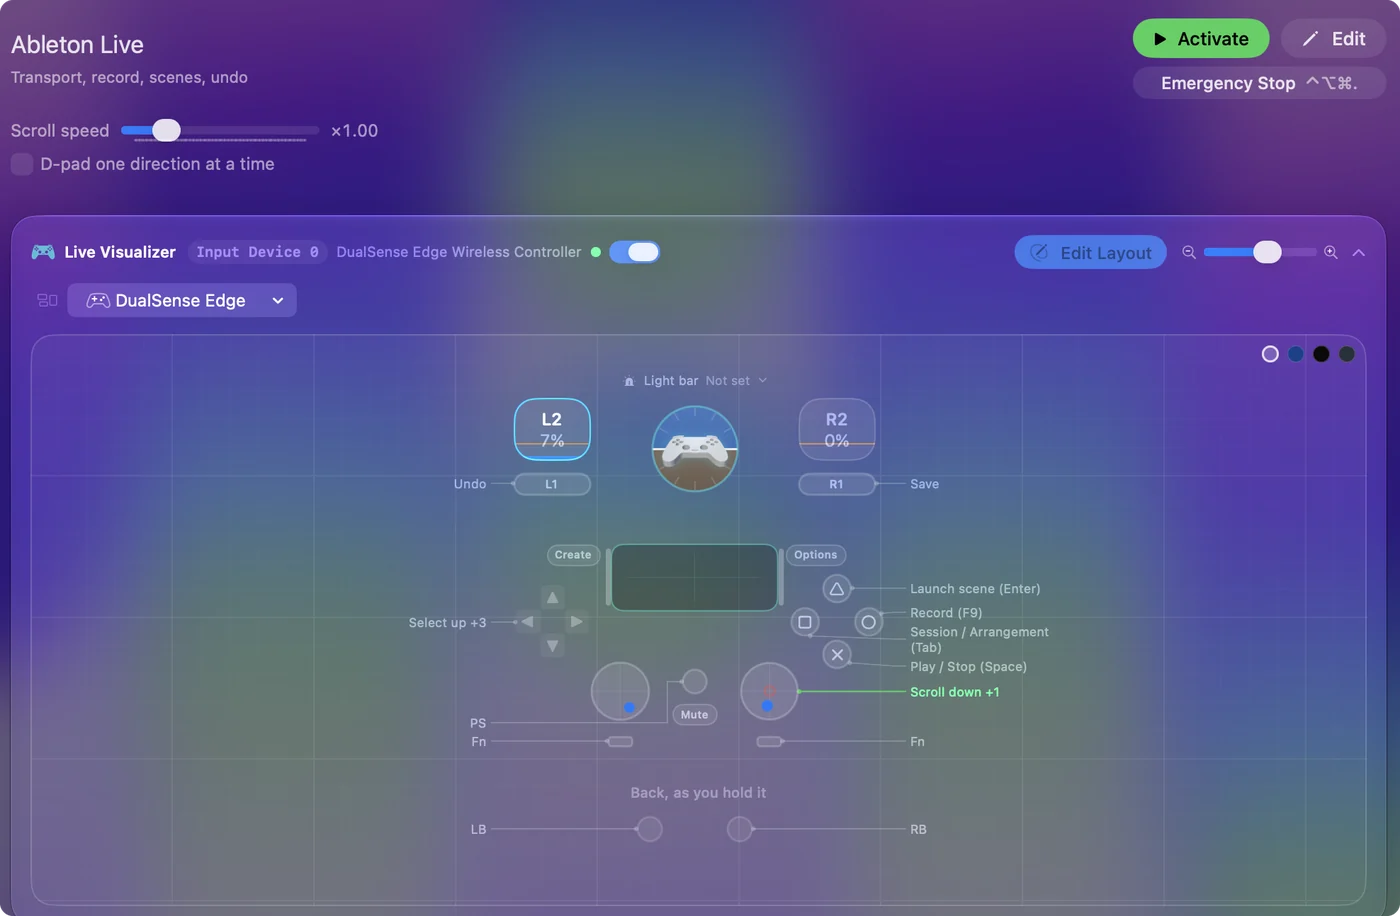
| Controller | Sends | What it does |
|---|---|---|
| A / Cross | Space | Play / Stop (Space) |
| B / Circle | F9 | Record (F9) |
| X / Square | Tab | Session / Arrangement (Tab) |
| Y / Triangle | Return | Launch scene (Enter) |
| D-pad up | Up | Select up |
| D-pad down | Down | Select down |
| D-pad left | Left | Select left |
| D-pad right | Right | Select right |
| LB / L1 | Command (Left), Z | Undo |
| RB / R1 | Command (Left), S | Save |
| Right stick down | Scroll down | Scroll down |
| Right stick up | Scroll up | Scroll up |
Button names follow the Xbox / PlayStation pair shown in the editor, so A / Cross is the bottom face button on either pad. On a Switch Pro Controller the bottom button is labeled B; the mapping still fires on position.
Questions
Can a game controller be a MIDI controller for Ableton Live?
Yes, through InputConfig's virtual MIDI port: notes, control change and pitch bend from any button or stick.
Does Live see the controller as a control surface?
It sees a MIDI input named InputConfig. Map controls with MIDI Map Mode rather than choosing it as a control surface script.
Related
Completely free. You don't have to make an account, there are no subscriptions, and nothing is locked. Optimized for Apple silicon. Open source on GitHub.
Updated