The Outlast Trials on a Mac with a controller
 The The Outlast Trials layout is built into InputConfig, free on the Mac App Store. You don't have to make an account, there are no subscriptions, and nothing is locked. Optimized for Apple silicon.
On a Mac: No Mac version. On a Mac it streams from a Windows PC you own (Moonlight, Parsec or Steam Link) or from a cloud service that carries it, and the stream normally passes a controller to the game's full pad support.
Yes, The Outlast Trials plays on a Mac with a controller, as a stream. Steam lists full controller support, so when the stream passes your pad, use that. This layout covers a pad the stream misses. Outlast is running and hiding, so sprint and crouch are where a thumb finds them under panic, and the lean is on the bumpers so you can peek without stepping out.
On this page: 9 sections
- The layout, control by control
- How the layout thinks
- Tune it
- If the stream passes your controller
- The Outlast Trials controller support: controller or keyboard
- If your controller is not working in The Outlast Trials
- Get it in two clicks
- The Outlast Trials controls: every button and the key it sends
- Questions
The layout, control by control
How the layout thinks
- Move and look. The left stick moves, the right stick looks, and the left stick click is sprint.
- Hide. The right face button holds crouch (Left Ctrl), and the bottom one jumps and vaults (Space). The bumpers peek left (Q) and right (E).
- Hands. The right trigger interacts and grabs (left click), and the left trigger uses the equipped item (right click).
- Rig and vision. The left face button activates the rig (R), and the top toggles night vision (F).
- Items. The D-pad picks item slots 1 to 4 and Create slot 5. The Home button drops or gives an item (X).
- Voice and menu. The right stick click is push-to-talk (V), and Escape is on Options.
Lean is on the bumpers, so you can look round a corner without stepping out from it.
Tune it
- Slide. It is sprint into crouch. Both are already there.
- Look. Raise the look rows' Speed from 12 for the panic 180.
A faster look is what turns you round before they catch you.
If the stream passes your controller
When the stream gives the game your pad, its own scheme, with DualSense and DualShock support, is the one to use. Keep this preset off then, or every press lands twice. Crouch once with the preset off first, and activate the layout only if you stay standing.
The Outlast Trials controller support: controller or keyboard
Steam's store page lists full controller support for The Outlast Trials, so the game was made to be played on a controller, menus included. A keyboard and mouse work as well, and the choice is yours. On a Mac, use the game's own controller support first when it sees your pad; this layout is for a pad it does not see, or for buttons it will not let you move. Full support listed means the controller is a first-class way to play The Outlast Trials.
From Steam's listing, checked in October 2026. Every game's listing is in Mac games with controller support.
If your controller is not working in The Outlast Trials
When The Outlast Trials does not react to your controller on a Mac, climb this ladder, smallest step first:
- Check that the Mac sees the controller. Open the gamepad tester and press a button. If nothing lights up there, the problem is the connection, and a controller that is connected but not working covers that first.
- Press a button after the stream has started. A stream only picks up a controller that is paired with the Mac, and a browser shows a controller to a page only after a button press. Start The Outlast Trials, then press any button. Streaming from your own PC has its own checks, in how to stream PC games to a Mac with a controller.
- Play it from keys. If The Outlast Trials still ignores the pad, activate this layout. It sends the keyboard and mouse controls The Outlast Trials already reads. Turn the game's own controller option off while it runs, or a press can arrive twice. The layout works whether or not The Outlast Trials ever sees the controller.
Get it in two clicks
- Get InputConfig free on the Mac App Store, open it, and click Smart Preset Maker on the welcome screen.
- Search for The Outlast Trials and pick it. The layout is created as a preset in your sidebar, named and ready.
- Press Activate. Every row can be changed afterwards: the editor's Scan button rebinds any control the moment you touch it.
To check the controller itself first, the gamepad tester shows every button and stick live in your browser.
The Outlast Trials controls: every button and the key it sends
The Sends column is The Outlast Trials's default keyboard and mouse controls, as this layout expects them. If you changed a key in the game's settings, change the same row in InputConfig.
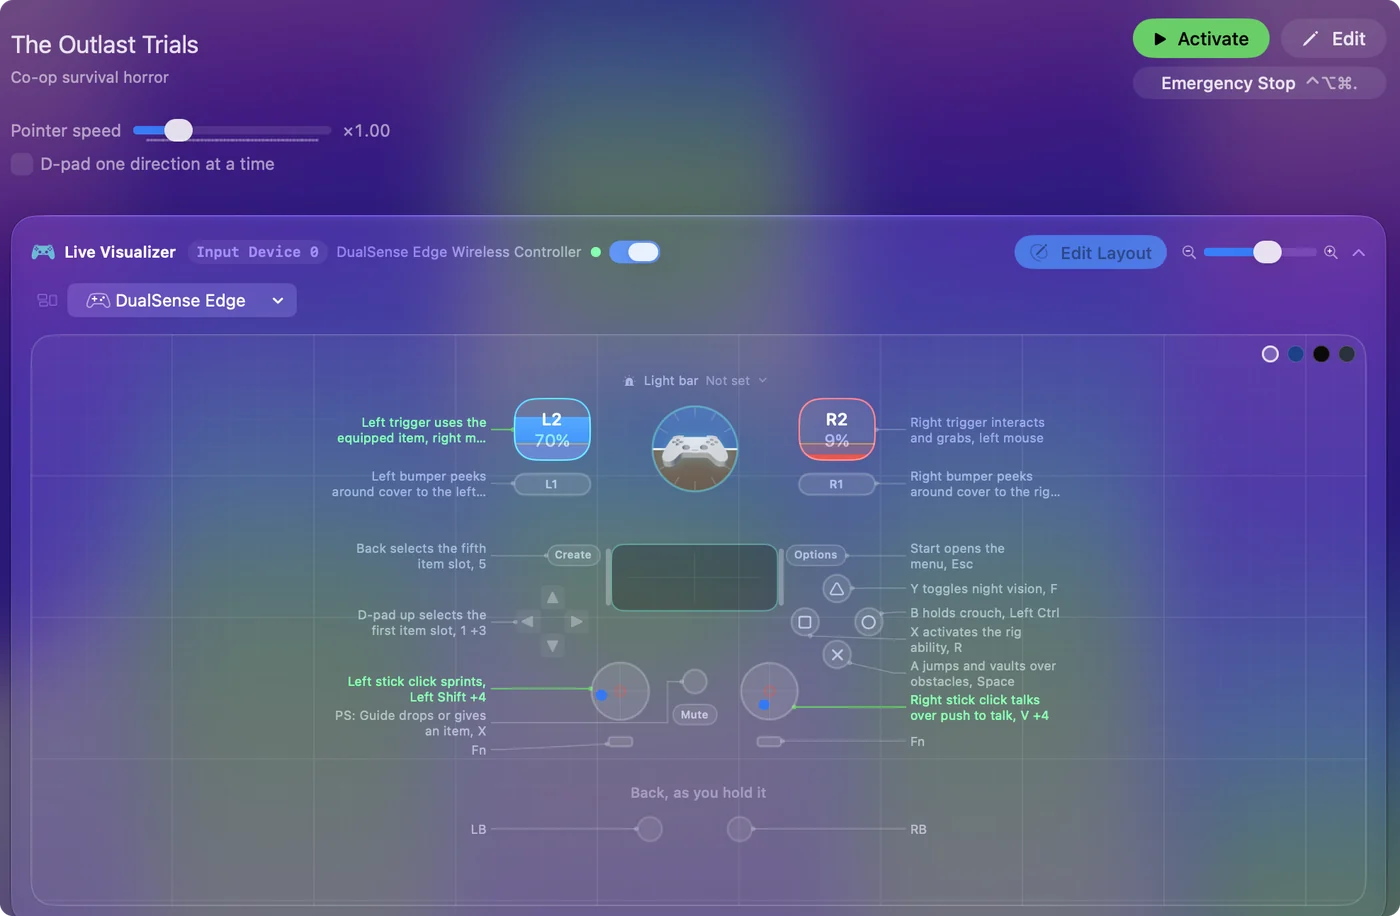
| Controller | Sends | What it does |
|---|---|---|
| L3 (left stick click) | Shift (Left) | Left stick click sprints, Left Shift |
| B / Circle | Ctrl (Left) | B holds crouch, Left Ctrl |
| A / Cross | Space | A jumps and vaults over obstacles, Space |
| Right trigger | Left click | Right trigger interacts and grabs, left mouse |
| Left trigger | Right click | Left trigger uses the equipped item, right mouse |
| X / Square | R | X activates the rig ability, R |
| Y / Triangle | F | Y toggles night vision, F |
| LB / L1 | Q | Left bumper peeks around cover to the left, Q |
| RB / R1 | E | Right bumper peeks around cover to the right, E |
| R3 (right stick click) | V | Right stick click talks over push to talk, V |
| D-pad up | 1 | D-pad up selects the first item slot, 1 |
| D-pad down | 2 | D-pad down selects the second item slot, 2 |
| D-pad left | 3 | D-pad left selects the third item slot, 3 |
| D-pad right | 4 | D-pad right selects the fourth item slot, 4 |
| Back / Share / Select | 5 | Back selects the fifth item slot, 5 |
| Start / Options | Escape | Start opens the menu, Esc |
| Home / PS / Guide | X | Guide drops or gives an item, X |
| Left stick up | W | Left stick up moves forward, W |
| Left stick down | S | Left stick down moves back, S |
| Left stick left | A | Left stick left strafes, A |
| Left stick right | D | Left stick right strafes, D |
| Right stick left | Mouse motion left (speed 12) | Right stick turns the camera, mouse X |
| Right stick right | Mouse motion right (speed 12) | Right stick turns the camera, mouse X |
| Right stick up | Mouse motion up (speed 12) | Right stick pitches the camera, mouse Y |
| Right stick down | Mouse motion down (speed 12) | Right stick pitches the camera, mouse Y |
Button names follow the Xbox / PlayStation pair shown in the editor, so A / Cross is the bottom face button on either pad. On a Switch Pro Controller the bottom button is labeled B; the mapping still fires on position.
Questions
Does The Outlast Trials run on a Mac?
The Outlast Trials does not run natively on a Mac. Stream it from a Windows PC you own or a cloud service that carries it. This layout covers a stream that does not see the pad.
Does The Outlast Trials have controller support?
Yes. Steam lists full controller support, with DualSense and DualShock support. When your stream passes the pad, use that. This layout sends keyboard and mouse for a stream that does not see the controller.
Does The Outlast Trials have controller support?
Yes. Steam lists full controller support for The Outlast Trials, so every part of the game can be played on a controller.
Is The Outlast Trials better with a controller or a keyboard?
Both work. Steam lists full controller support for The Outlast Trials, so it was made to be played on a controller, and a keyboard and mouse work as well.
Why is my controller not working in The Outlast Trials on a Mac?
First check the Mac itself sees the controller, with the gamepad tester. If it does and The Outlast Trials still ignores it, activate the The Outlast Trials layout in InputConfig, which sends the game's keyboard and mouse controls from the controller.
Can I play The Outlast Trials on an M1 Mac or a MacBook Air?
Yes, through a stream. The Outlast Trials runs on the other end, on a cloud service or your own PC, so the Mac only plays the video and sends your input. An M1 MacBook Air streams it like any other Mac.
Does The Outlast Trials run in CrossOver on a Mac?
I have not tested The Outlast Trials in CrossOver. CodeWeavers keeps a compatibility list where players report how each Windows game runs. If it runs and the controller is not seen, this layout plays it from the keys and mouse.
Related
Completely free. You don't have to make an account, there are no subscriptions, and nothing is locked. Optimized for Apple silicon. Open source on GitHub.
Updated