Cubase from a game controller
 The Steinberg Cubase layout is built into InputConfig, free on the Mac App Store. You don't have to make an account, there are no subscriptions, and nothing is locked. Optimized for Apple silicon.
On a Mac: Cubase for Mac reads numeric keypad keys from this layout even on a MacBook with no keypad, because InputConfig sends the keypad's own key codes.
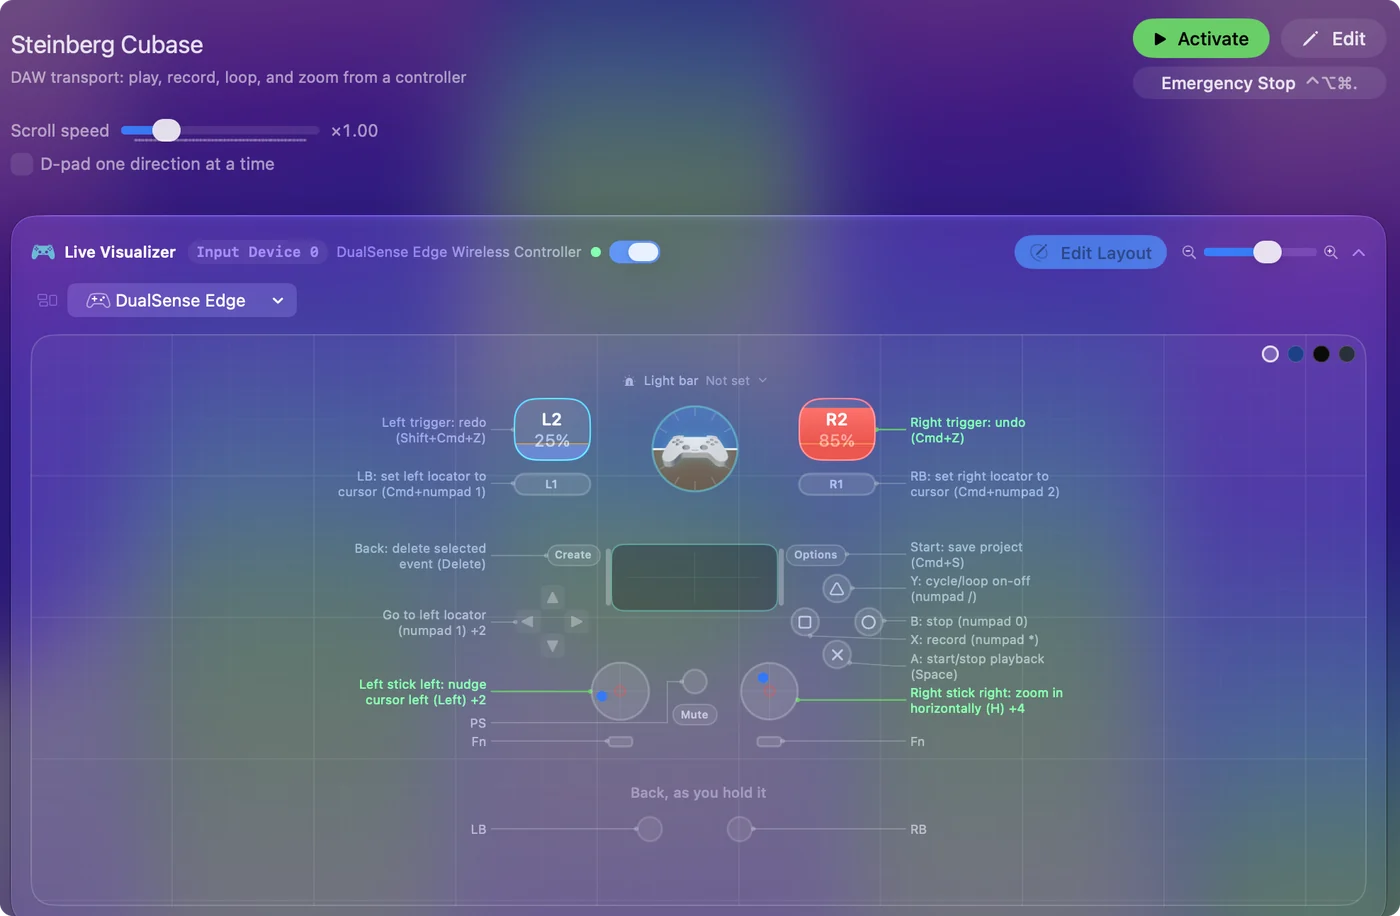
Yes, Cubase's numeric keypad transport works on a game controller, which matters most on a Mac with no numpad. Play, stop, record and cycle sit on the face buttons, the locators on the D-pad, and setting the locators on the bumpers. Punching a loop is four buttons and no keyboard.
The layout, control by control
How the layout thinks
- Transport. Start and stop (Space) on the bottom face button, stop (keypad 0) on the right, record (keypad star) on the left, cycle (keypad slash) on the top.
- Locators. D-pad left and right go to the left and right locators (keypad 1 and 2). The bumpers set them to the cursor (Command keypad 1 and 2). D-pad up returns to the start (keypad Enter).
- Zoom and scroll. Right stick left and right zoom out and in (G and H), up and down scroll. The left stick nudges the cursor.
- Undo and redo. The right trigger undoes, the left redoes.
- Markers, delete, save. The stick clicks go to the next and previous marker, Share or View deletes the selected event, Options saves.
Cubase reads keypad keys from this layout even on a MacBook, because InputConfig sends the keypad's own key codes. The numpad transport works on a laptop with no numpad.
Tune it for Cubase
- Metronome. Put C on the touchpad press.
- Notes from the pad. Send InputConfig's MIDI output into Cubase, and enable the InputConfig input in Studio Setup. The gamepad as a MIDI instrument guide has a preset.
- Know it is recording. Turn on Vibrate on the record row.
Nuendo shares the transport keys, so the layout works there too. Set the locators from the bumpers, cycle, record: a punch-in from the pad.
Get it in two clicks
- Get InputConfig free on the Mac App Store, open it, and click Smart Preset Maker on the welcome screen.
- Search for Steinberg Cubase and pick it. The layout is created as a preset in your sidebar, named and ready.
- Press Activate. Every row can be changed afterwards: the editor's Scan button rebinds any control the moment you touch it.
Every binding, as a table
| Controller | Sends | What it does |
|---|---|---|
| A / Cross | Space | A: start/stop playback (Space) |
| B / Circle | Keypad 0 | B: stop (numpad 0) |
| X / Square | Keypad * | X: record (numpad *) |
| Y / Triangle | Keypad / | Y: cycle/loop on-off (numpad /) |
| D-pad left | Keypad 1 | Go to left locator (numpad 1) |
| D-pad right | Keypad 2 | Go to right locator (numpad 2) |
| LB / L1 | Command (Left), Keypad 1 | LB: set left locator to cursor (Cmd+numpad 1) |
| RB / R1 | Command (Left), Keypad 2 | RB: set right locator to cursor (Cmd+numpad 2) |
| D-pad up | Keypad Enter | Return to start (numpad Enter) |
| Right stick right | H | Right stick right: zoom in horizontally (H) |
| Right stick left | G | Right stick left: zoom out horizontally (G) |
| Right stick up | Scroll up | Right stick up: scroll up |
| Right stick down | Scroll down | Right stick down: scroll down |
| Left stick left | Left | Left stick left: nudge cursor left (Left) |
| Left stick right | Right | Left stick right: nudge cursor right (Right) |
| Right trigger | Command (Left), Z | Right trigger: undo (Cmd+Z) |
| Left trigger | Shift (Left), Command (Left), Z | Left trigger: redo (Shift+Cmd+Z) |
| Back / Share / Select | Delete | Back: delete selected event (Delete) |
| Start / Options | Command (Left), S | Start: save project (Cmd+S) |
| L3 (left stick click) | Shift (Left), N | L3: locate next marker (Shift+N) |
| R3 (right stick click) | Shift (Left), B | R3: locate previous marker (Shift+B) |
Button names follow the Xbox / PlayStation pair shown in the editor, so A / Cross is the bottom face button on either pad. On a Switch Pro Controller the bottom button is labeled B; the mapping still fires on position.
Questions
Does it work in Nuendo?
The transport keys are the same, so yes.
I have no numpad. Will the keypad rows work?
Yes. InputConfig sends the keypad's key codes directly, so Cubase sees a numpad press.
Related
Completely free. You don't have to make an account, there are no subscriptions, and nothing is locked. Optimized for Apple silicon. Open source on GitHub.
Updated